
Using Yabai

yabai is an awesome window manager for macOS. It handles tiling, snapping, layouts, and controls your windows. It automatically modifies all your windows layout so you can focus on exactly what you need to.
As of the time of writing this article, macOS High Sierra 10.13.6, Mojave 10.14.4+, Catalina 10.15.0+ and Big Sur 11.0.1 are supported.
You can get layouts and have layouts like the one seen below:
Let’s get started installing yabai. First we need XCode if you don’t have it installed already.
xcode-select --installTo get all the yabai features running, you’ll have to disable macOS’s System Integrity Protection, at least temporarily. You can find the instructions on Github.
Disabling System Integrity Protection
-
Turn off your device
-
Hold down
command ⌘+Rwhile booting your device. -
From the top menu bar, choose
Utilities, thenTerminal.- If you’re on macOS 11.0.1, you’ll have to disable
Requires Filesystem ProtectionsandDebugging Restriction.
csrutil disable --with kext --with dtrace --with nvram --with basesystemIf you’re on macOS 10.14 and 10.15
csrutil enable --without debug --without fsIf you’re on macOS 10.13
csrutil disable - If you’re on macOS 11.0.1, you’ll have to disable
-
Reboot
- You can verify that System Integrity Protection is disabled by running
csrutil status. This command will returnSystem Integrity Protection status: disabledif it is turned off (may show as unknown for newer versions of macOS when disabling SIP partially).
- You can verify that System Integrity Protection is disabled by running
Install
If you DO NOT have Homebrew installed, first we’ll need to install it:
/bin/bash -c "$(curl -fsSL https://raw.githubusercontent.com/Homebrew/install/master/install.sh)"If you aleady have Homebrew installed:
brew install koekeishiya/formulae/yabai
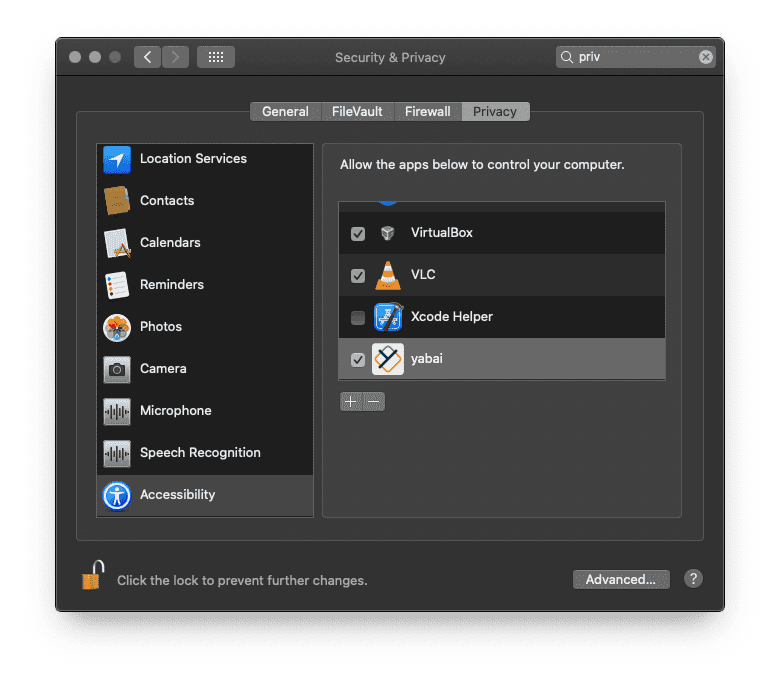
Next we’ll have to grant permission under Accessibility for yabai.
Next let’s run scripting:
sudo yabai --install-saRestart the dock to wrap this part up:
killall DockStart
brew services start yabaiSetup
To set Yabai up, we just need to configure a .yabairc file. This can live wherever but typically I keep dotfiles together in the home ~/ directory. Templates of these files are on listed on the official Github. But if you’re feeling lazy or just want to dive right in, here’s my Yabai config.
You can download these or just create the file like so:
touch ~/.yabaircor to clone mine (previewed in the long snippet right below):
wget -qO- https://raw.githubusercontent.com/arbitrarily/yabairc/master/.yabairc > ~/.yabaircMy yabairc config file:
#!/usr/bin/env sh
# bar settings
yabai -m config status_bar off
yabai -m config status_bar_text_font "Helvetica Neue:Bold:12.0"
yabai -m config status_bar_icon_font "FontAwesome:Regular:12.0"
yabai -m config status_bar_background_color 0xff202020
yabai -m config status_bar_foreground_color 0xffa8a8a8
yabai -m config status_bar_space_icon_strip I II III IV V VI VII VIII IX X
yabai -m config status_bar_power_icon_strip
yabai -m config status_bar_space_icon
yabai -m config status_bar_clock_icon
# global settings
yabai -m config mouse_follows_focus off
yabai -m config focus_follows_mouse off
yabai -m config window_placement second_child
yabai -m config window_opacity off
yabai -m config window_opacity_duration 0.0
yabai -m config window_shadow float
yabai -m config window_border off
yabai -m config window_border_placement inset
yabai -m config window_border_width 4
yabai -m config window_border_radius -1.0
yabai -m config active_window_border_topmost off
yabai -m config active_window_border_color 0xff775759
yabai -m config normal_window_border_color 0xff505050
yabai -m config insert_window_border_color 0xffd75f5f
yabai -m config active_window_opacity 1.0
yabai -m config normal_window_opacity 1.0
yabai -m config split_ratio 0.50
yabai -m config auto_balance off
yabai -m config focus_follows_mouse off
yabai -m config mouse_follows_focus off
yabai -m config mouse_modifier ctrl
yabai -m config mouse_action1 move
yabai -m config mouse_action2 resize
yabai -m config window_topmost off
# general space settings
yabai -m config layout bsp
yabai -m config top_padding 15
yabai -m config bottom_padding 15
yabai -m config left_padding 15
yabai -m config right_padding 15
yabai -m config window_gap 15
# Float Windows
yabai -m rule --add app=Finder manage=off
yabai -m rule --add app=Tweetbot manage=off
# yabai -m rule --add app=Photoshop manage=off
# yabai -m rule --add app=Illustrator manage=off
yabai -m rule --add app=Vox manage=off
yabai -m rule --add app=checkra1n manage=off
yabai -m rule --add app=ColorSlurp manage=off
yabai -m rule --add app=System Preferences manage=off
yabai -m rule --add app=VOX manage=off
yabai -m rule --add app=The\ Unarchiver manage=off
yabai -m rule --add app=System\ Preferences manage=off
yabai -m rule --add app=CleanMyMac\ X manage=off
yabai -m rule --add app=1Password\ 7 manage=off
yabai -m rule --add app=Surfshark manage=off
yabai -m rule --add app=Calculator manage=off
yabai -m rule --add app=Kodi manage=off
yabai -m rule --add app=VLC manage=off
yabai -m rule --add app="Axis & Allies 1942 Online" manage=off
yabai -m rule --add app="AxisAndAllies1942Online" manage=off
yabai -m rule --add app="Alfred Preferences" manage=off
echo "yabai configuration loaded.."Mostly I created ‘float’ rules for applications and programs that don’t seem to play nice or aren’t responsive.
If you’d like to learn more about creating your own ‘layouts’ and ‘rules’, peep the official documentation for a detailed walk-through on configuring yabai the way you’d like.
then:
chmod +x ~/.yabaircKey Binding
If you’d like to keybind all your commands, you can pair Yabai with skhd. skhd is a keybind manager daemon for Mac OS.
Official Documentation
You can find the official Wiki documentation on Github.
Video Guide
Jesse Skelton has created an awesome instructional video and walk-through for using yabai. You can view that original video here if you need to save it for later or something.
Managing Yabai
To control the program from the command line:
# stop, and upgrade yabai
brew services stop yabai
brew upgrade yabai

# uninstall the scripting addition
sudo yabai --uninstall-sa

# installing the scripting addition will restart Dock.app
sudo yabai --install-sa

# finally, start yabai
brew services start yabai
Notes
I’m not currently on Big Sur (Mac OS 11.0), but if you are:
In macOS Big Sur we had to switch to using the mach API to inject the scripting addition. Injection now has to run with elevated (root) privileges, meaning that yabai is no longer able to automatically load the scripting addition during startup. However, you can use the following workaround to make it pretty much as seamless as it used to be. The trick is to allow your user to execute
yabai --load-saas the root user without having to enter a password. To do this, we add a new configuration entry that is loaded by/etc/sudoers.
# create a new file for writing - visudo uses the vim editor by default.
# go read about this if you have no idea what is going on.
sudo visudo -f /private/etc/sudoers.d/yabai

# input the line below into the file you are editing.
# replace <user> with your username (output of: whoami).
# change the path to the yabai binary if necessary  (output of: which yabai)
<user> ALL = (root) NOPASSWD: /usr/local/bin/yabai --load-sa
After the above edit has been made, simply add the command to load the scripting addition to the top of your yabairc config file
# the scripting-addition must be loaded manually if
# you are running yabai on macOS Big Sur. Uncomment
# the following line to have the injection performed
# when the config is executed during startup.

# for this to work you must configure sudo such that
# it will be able to run the command without password

sudo yabai --load-sa
yabai -m signal --add event=dock_did_restart action="sudo yabai --load-sa"

# .. more yabai startup stuff
Quickly restart the yabai launch agent
When running through brew services, restarting yabai using brew services restart yabai can take a few seconds. You can achieve (almost) the same effect by running this command instead:
launchctl kickstart -k "gui/${UID}/homebrew.mxcl.yabai"

# e.g. bind to key in skhd:
# ctrl + alt + cmd - r : launchctl kickstart -k "gui/${UID}/homebrew.mxcl.yabai"
Overall the official documentation is awesome, highly recommend exploring that once you’ve gotten things set up.